Laravel streamlines database interaction, offering seamless support for four leading database systems
- MySQL
- Postgres
- SQLite
- SQL Server

We will utilize a simple student management system to explore all of the CRUD (Create, Read, Update, Delete) activities with Laravel. The query to the database can be launched using raw SQL, the fluent query builder, and the Eloquent ORM.
Establishing a Database Connection
Create the college database using MySQL and configure it in the config/database.php file, as indicated in the table below.
| Column Name | Column Datatype | Extra |
| Id | int(11) | Primary key | Auto increment |
| Name | varchar(25) |
We’ll look at how to use Laravel in a student table to add, remove, edit, and retrieve records from a database.
| Sr.No. | Record & Description |
| 1 | Insert Records: The DB facade’s insert method allows us to add the record. |
| 2 | Retrieve Records: Once the database has been configured, we can use the DB façade with select method to access the records. |
| 3 | Update Records: Using the update method, we can use the database facade to update the records. |
| 4 | Delete Records: Using the delete method in the DB facade, we can remove the record. |
Logging and Errors in Laravel
Laravel’s error and logging functionality offers a sophisticated approach to application monitoring. It goes beyond simple error reporting by providing configurable logging channels (files, services, email notifications) to capture detailed error messages, stack traces, and relevant context. This granular control allows developers to tailor logging to their specific needs, facilitating efficient debugging and issue resolution.
Errors
A project is certain to make a few mistakes while it is in progress. In a new Laravel project, you are already set up to handle errors and exceptions. In a local context, we typically need to notice errors in order to troubleshoot. These faults must be concealed from users in the production environment. This can be accomplished by setting the variable APP_DEBUG in the environment file .env that is kept at the application’s root.
In the local context, APP_DEBUG should be set to true however, in order to conceal faults in production, it must be set to false.
Notes – You should restart the Laravel server after making changes to the APP_DEBUG variable.
Logging
Logging is a crucial tool that allows the system to record errors that are produced. It is beneficial to increase the system’s dependability. Single, daily, syslog, and error log modes are among the several logging modes that Laravel offers. The config/app.php file contains the settings for these modes.
'log' => 'daily'Application logs, detailing events and errors, are conveniently stored in storage/logs/laravel.log.
Forms in Laravel
Laravel comes with a number of built-in tags that make handling HTML forms simple and safe. Laravel is used to generate HTML’s main components. This requires that we use composer to add the HTML package to Laravel.
Example 1
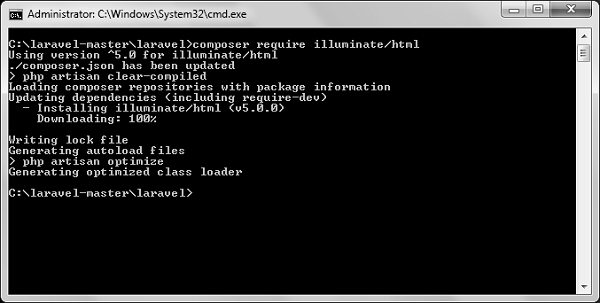
Step 1 – To continue with the same, execute the following command.
composer require illuminate/htmlStep 2 – This will add the HTML package to Laravel, as seen in the picture below.
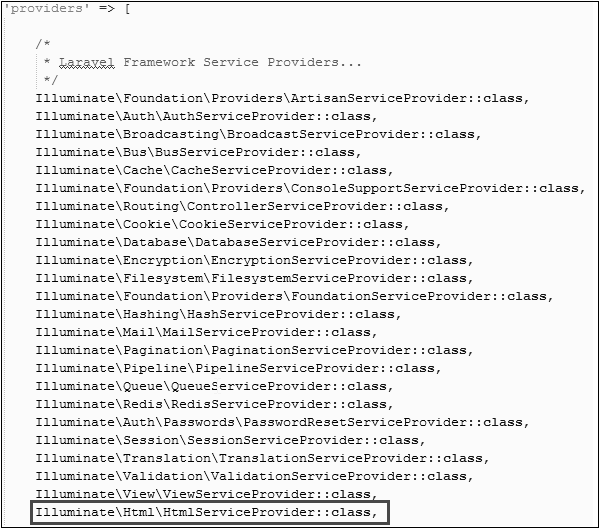
Step 3 – The package mentioned above must now be included to the Laravel configuration file, which is located at config/app.php. When you open this file, a list of Laravel service providers will appear, as seen in the image below. As seen in the highlighted area in the accompanying image, add the HTML service provider.
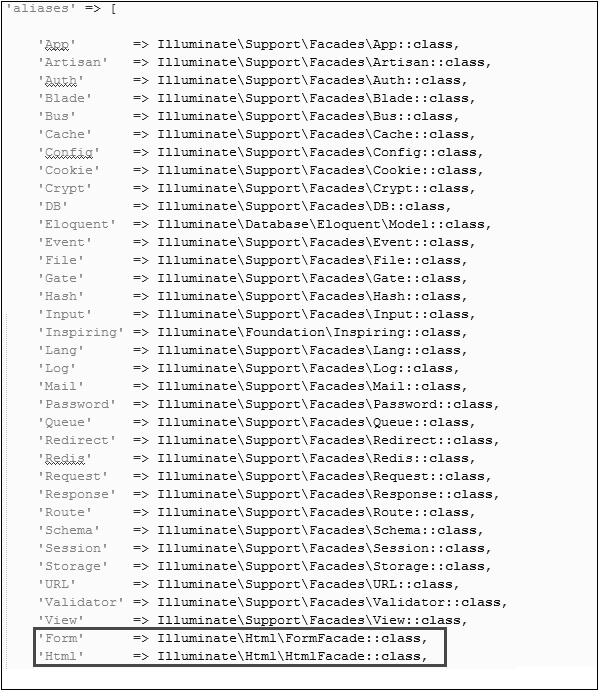
Step 4 – Include both HTML and Form aliases in the same file. In the accompanying figure, take note of the two lines that are shown in the outlined box, then add them.
Step 5 – Everything is set up now. Let’s see how Laravel tags can be used with different HTML components.
Accessing the Form
{{ Form::open(array('url' => 'foo/bar')) }}
   //
{{ Form::close() }}
Adding a Label Element
echo Form::label('email', 'E-Mail Address');Adding a Text Input
echo Form::text('username');Defining a Default Value
echo Form::text('email', 'example@gmail.com');Creating a Password Input
echo Form::password('password');Building a File Input Field
echo Form::file('image');Building Checkbox/Radio Input Elements
echo Form::checkbox('name', 'value');
echo Form::radio('name', 'value');
Building Pre-selected Checkbox/Radio Input Elements
echo Form::checkbox('name', 'value', true);
echo Form::radio('name', 'value', true);
Dropdown Element Creation
echo Form::select('size', array('L' => 'Large', 'S' => 'Small'));Implementing a Submit Button
echo Form::submit('Click Me!');Example 2
Step 1 – To create a view named, copy the following code resources/views/form.php.
resources/views/form.php
<html>
   <body>

      <?php
         echo Form::open(array('url' => 'foo/bar'));
            echo Form::text('username','Username');
            echo '<br/>';

            echo Form::text('email', 'example@gmail.com');
            echo '<br/>';

            echo Form::password('password');
            echo '<br/>';

            echo Form::checkbox('name', 'value');
            echo '<br/>';

            echo Form::radio('name', 'value');
            echo '<br/>';

            echo Form::file('image');
            echo '<br/>';

            echo Form::select('size', array('L' => 'Large', 'S' => 'Small'));
            echo '<br/>';

            echo Form::submit('Click Me!');
         echo Form::close();
      ?>

   </body>
</html>
Step 2 – To add a route for view form.php, add the code below to app/Http/routes.php
app/Http/routes.php
Route::get('/form',function() {
   return view('form');
});
Step 3 – To view the form, go to the following URL.
http://localhost:8000/form