In Laravel, uploading files is quite simple. All we have to do is make a controller where uploaded files are processed and a view file where a user can choose which file to upload.

The following line of code must be added to a view file in order to produce a file input.
Form::file('file_name');As seen below, we must add “files”=>”true” to Form::open(). This makes it easier to upload the form in sections.
Form::open(array('url' => '/uploadfile','files'=>'true'));Example
Step 1 − The following code should be copied into a view file named resources/views/uploadfile.php.
views/resources/uploadfile.php
<pre class="language-php"><code><html>
<body>
<?php
echo Form::open(array('url' => '/uploadfile','files'=>'true'));
echo 'Select the file to upload.';
echo Form::file('image');
echo Form::submit('Upload File');
echo Form::close();
?>
</body>
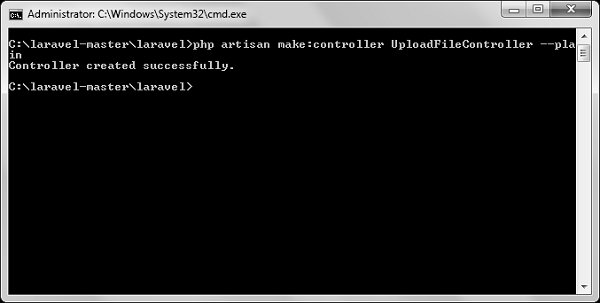
</html></code></pre>Step 2 −Use the following command to create a controller named UploadFileController.
php artisan make:controller UploadFileController --plainStep 3 − The following output will be sent to you following a successful execution:
Step 4 − Copy the following code in
app/Http/Controllers/UploadFileController.php file.
app/Http/Controllers/UploadFileController.php
<?php

namespace App\Http\Controllers;

use Illuminate\Http\Request;
use App\Http\Requests;
use App\Http\Controllers\Controller;

class UploadFileController extends Controller {
   public function index() {
      return view('uploadfile');
   }
   public function showUploadFile(Request $request) {
      $file = $request->file('image');

      //Display File Name
      echo 'File Name: '.$file->getClientOriginalName();
      echo '<br>';

      //Display File Extension
      echo 'File Extension: '.$file->getClientOriginalExtension();
      echo '<br>';

      //Display File Real Path
      echo 'File Real Path: '.$file->getRealPath();
      echo '<br>';

      //Display File Size
      echo 'File Size: '.$file->getSize();
      echo '<br>';

      //Display File Mime Type
      echo 'File Mime Type: '.$file->getMimeType();

      //Move Uploaded File
      $destinationPath = 'uploads';
      $file->move($destinationPath,$file->getClientOriginalName());
   }
}
Step 5 − The lines below should be added to app/Http/routes.php.
app/Http/routes.php
Route::get('/uploadfile','UploadFileController@index');
Route::post('/uploadfile','UploadFileController@showUploadFile');
Step 6 − To test the upload file feature, go to the following URL.
http://localhost:8000/uploadfileStep 7 − A prompt similar to the one in the following image will be sent to you.

Sending Email with Laravel
To send emails, Laravel uses the feature-rich, free SwiftMailer package. We may send emails quickly and easily by using the library function. You can use the Blade syntax to inject data into your email templates because they are loaded in the same manner as views.
The send function’s syntax and properties are displayed in the following table.
| Syntax | void send(string|array $view, array $data, Closure|string $callback) |
| Parameters | $view(string|array) − name of the view that contains email message $data(array) − array of data to pass to view $callback − a Closure callback which receives a message instance, allowing you to customize the recipients, subject, and other aspects of the mail message |
| Returns | nothing |
| Description | Sends email. |
The message instance that was obtained by the $callback closure in the third parameter allows us to call the functions listed below and modify the message as illustrated below.
- $message → subject(‘Welcome to the Tutorials Point’);
- $message → from(’email@example.com’, ‘Mr. Example’);
- $message → to(’email@example.com’, ‘Mr. Example’);
Among the less popular techniques are –
- $message → sender(’email@example.com’, ‘Mr. Example’);
- $message → returnPath(’email@example.com’);
- $message → cc(’email@example.com’, ‘Mr. Example’);
- $message → bcc(’email@example.com’, ‘Mr. Example’);
- $message → replyTo(’email@example.com’, ‘Mr. Example’);
- $message → priority(2);
The methods listed below can be used to embed or attach files:
- $message → attach(‘path/to/attachment.txt’);
- $message → embed(‘path/to/attachment.jpg’);
Emails can be sent in text or HTML format. As demonstrated below, you can supply an array in the first argument to specify the kind of message you wish to send. HTML is the most common type. Use the following syntax to send plain text emails.
Syntax
Mail::send([‘text’=>’text.view’], $data, $callback);An array is passed in as the first argument in this syntax. Make use of text as the view’s key name and key value.
Example
In order to send an email from your Gmail account, you must first configure it in a Laravel environment file (.env file). Create an application-specific password and change the .env parameters as indicated below, then enable 2-step verification in your Gmail account.
.env
MAIL_DRIVER = smtp
MAIL_HOST = smtp.gmail.com
MAIL_PORT = 587
MAIL_USERNAME = your-gmail-username
MAIL_PASSWORD = your-application-specific-password
MAIL_ENCRYPTION = tls
Step 2 − To restart the Laravel server and clear the cache after making changes to the.env file, run the two instructions below.
php artisan config:cacheStep 3 − To restart the Laravel server and clear the cache after making changes to the.env file, run the two instructions below.
Step 4 − You will obtain the following output following a successful execution:

Step 5 − Copy the following code in app/Http/Controllers/MailController.php file.
app/Http/Controllers/MailController.php
<?php

namespace App\Http\Controllers;
use Illuminate\Http\Request;
use Mail;

use App\Http\Requests;
use App\Http\Controllers\Controller;

class MailController extends Controller {
   public function basic_email() {
      $data = array('name'=>"Virat Gandhi");

      Mail::send(['text'=>'mail'], $data, function($message) {
         $message->to('abc@gmail.com', 'Tutorials Point')->subject
            ('Laravel Basic Testing Mail');
         $message->from('xyz@gmail.com','Virat Gandhi');
      });
      echo "Basic Email Sent. Check your inbox.";
   }
   public function html_email() {
      $data = array('name'=>"Virat Gandhi");
      Mail::send('mail', $data, function($message) {
         $message->to('abc@gmail.com', 'Tutorials Point')->subject
            ('Laravel HTML Testing Mail');
         $message->from('xyz@gmail.com','Virat Gandhi');
      });
      echo "HTML Email Sent. Check your inbox.";
   }
   public function attachment_email() {
      $data = array('name'=>"Virat Gandhi");
      Mail::send('mail', $data, function($message) {
         $message->to('abc@gmail.com', 'Tutorials Point')->subject
            ('Laravel Testing Mail with Attachment');
         $message->attach('C:\laravel-master\laravel\public\uploads\image.png');
         $message->attach('C:\laravel-master\laravel\public\uploads\test.txt');
         $message->from('xyz@gmail.com','Virat Gandhi');
      });
      echo "Email Sent with attachment. Check your inbox.";
   }
}
Step 6 − In the resources/views/mail.blade.php file, copy the following code.
views/resources/mail.blade.php
<h1>Hi, {{ $name }}</h1>
l<p>Sending Mail from Laravel.</p>
Step 7 − Add the lines listed below to app/Http/routes.php.
Routes.php in app/Http
Route::get('sendbasicemail','MailController@basic_email');
Route::get('sendhtmlemail','MailController@html_email');
Route::get('sendattachmentemail','MailController@attachment_email');
Step 8 − Check out the basic email by going to the following URL.
http://localhost:8000/sendbasicemailStep 9 − This is what the output screen will look like. View the standard email output by checking your inbox.

Step 10 − To test the HTML email, go to this URL.
http://localhost:8000/sendhtmlemailStep 11 − This is how the output screen will appear. To view the HTML email output, check your inbox.

Step 12 − To test the HTML email with attachment, go to the following URL.
http://localhost:8000/sendattachmentemailStep 13 − The output below is visible.

Note − The email address that can be sent from the from method in the MailController.php file should be the same email address. In most cases, the email address that is set up on your server should be used.
Using Ajax with Laravel
Asynchronous JavaScript and XML, or Ajax, is a collection of online development strategies that leverage a variety of client-side web technologies to construct asynchronous online applications. To use the jquery library’s ajax functions, which are used to transmit and receive data from the server via ajax, import it into your view file. You can use the response() function on the server side to deliver a response to the client. You can also chain the response function with the json() function to send the response in JSON format.
Using the json() Function
json(string|array $data = array(), int $status = 200, array $headers = array(), int $options)
Example
Step 1 − Make a view file named resources/views/message.php, then insert the code below.
<html>
<head>
<title>Ajax Example</title>
<script src = "https://ajax.googleapis.com/ajax/libs/jquery/2.1.3/jquery.min.js">
</script>
<script>
function getMessage() {
$.ajax({
type:'POST',
url:'/getmsg',
data:'_token = <?php echo csrf_token() ?>',
success:function(data) {
$("#msg").html(data.msg);
}
});
}
</script>
</head>
<body>
<div id = 'msg'>This message will be replaced using Ajax.
Click the button to replace the message.</div>
<?php
echo Form::button('Replace Message',['onClick'=>'getMessage()']);
?>
</body>
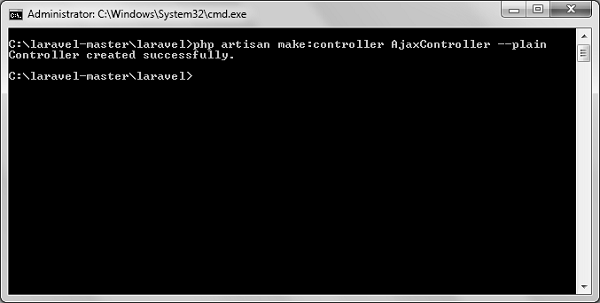
</html>Step 2 − Use the following command to create a controller named AjaxController.
php artisan make:controller AjaxController --plainStep 3 −Following a successful execution, you will obtain the output that follows:
Step 4 −The code below should be copied in app/Http/Controllers/AjaxController.php file.
app/Http/Controllers/AjaxController.php
<?php

namespace App\Http\Controllers;

use Illuminate\Http\Request;
use App\Http\Requests;
use App\Http\Controllers\Controller;

class AjaxController extends Controller {
   public function index() {
      $msg = "This is a simple message.";
      return response()->json(array('msg'=> $msg), 200);
   }
}
Step 5 − Add the lines listed below to app/Http/routes.php.
Routes.php in app/Http
Route::get('ajax',function() {
return view('message');
});
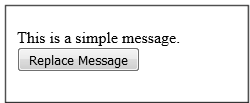
Route::post('/getmsg','AjaxController@index');Step 6 − To test the Ajax feature, go to the following URL.
http://localhost:8000/ajaxStep 7 −After that, you’ll be taken to a website with the message displayed in the image below.

Step 8 − Once the button is clicked, the result will look like the one in the accompanying image.