The majority of web apps feature built-in error-handling systems. They use these to log and monitor mistakes and exceptions in order to assess performance. You will learn how to handle errors in Laravel apps in this chapter.

Important Points
Before continuing to learn more about Laravel error handling, please take notice of these crucial points:
- By default, Laravel logs exceptions and errors in the App\Exceptions\Handler class for any new project. After that, they are returned to the user for examination.
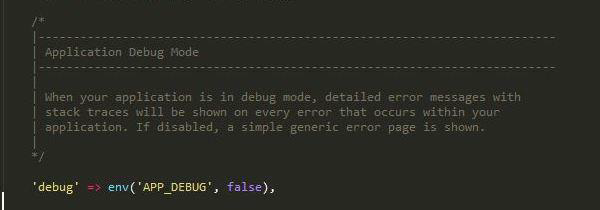
- Every issue that arises in your web application will display comprehensive error messages with stack traces while your Laravel application is in debug mode.
- Debugging mode is set to false by default, however it can be changed to true. This allows the user to use stack traces to track all problems.
Error Log
Errors in a web application can be tracked and a removal strategy can be planned with the help of logging. The web application’s config/app.php file contains the log information configuration options. When working with the Error Log in Laravel, please keep the following points in mind:
- The PHP logging library monolog is used by Laravel.
- Single, daily, syslog, and error log are the logging options used for error tracking.
- For instance, as indicated by the command below, you should set the log value in your app configuration to daily if you want to log the error messages in log files.
'log' => env('APP_LOG',’daily’),- By default, Laravel keeps error logs for five days if the daily log mode is selected as the parameter. You must set the log_max_files parameter in the configuration file to the desired value if you want to alter the maximum number of log files.
‘log_max_files’ => 25;Configuring Log Levels in Laravel
Since Laravel makes use of the PHP logging library called monolog, a number of parameters are used to analyze severity levels. Error, critical, alert, and emergency notifications are among the different severity levels that are accessible. The command below demonstrates how to set the severity level.
'log_level' => env('APP_LOG_LEVEL', 'error')Event Handling in Laravel
A user can subscribe to and listen to different events that are triggered in the web application thanks to Events’ straightforward observer implementation. In Laravel, the app/Events folder contains all of the event classes, while the app/Listeners folder contains the listeners.
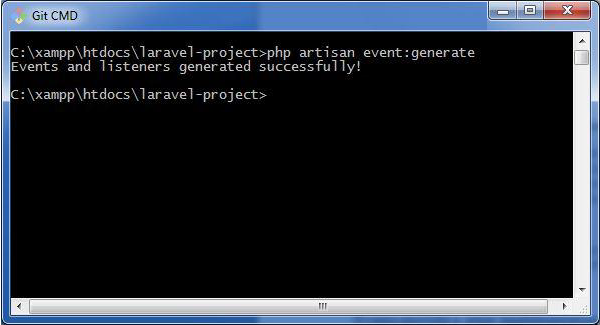
The following illustrates the artisan command for creating events and listeners in your web application:
php artisan event:generateAs previously mentioned, this command creates the events and listeners for the corresponding folders.
Event.php
<?php
namespace App\Events;
abstract class Event{
   //
}
As previously stated, event.php calls for the namespace App\Events and contains the fundamental description of class Event. Please be aware that this file contains user-defined or custom events.
<?php
namespace App\Events;
use App\Events\Event;
use Illuminate\Queue\SerializesModels;
use Illuminate\Contracts\Broadcasting\ShouldBroadcast;
class SomeEvent extends Event{
   use SerializesModels;
   /**
      * Create a new event instance.
      *
      * @return void
   */

   public function __construct() {
      //
   }

   /**
      * Get the channels the event should be broadcast on.
      *
      * @return array
   */

   public function broadcastOn() {
      return [];
   }
Keep in mind that this file initializes the required parameters and broadcasts events in a web application using serialization.
For instance, the following method can be used to initialize the order variable in the constructor for registering an event:
public function __construct(Order $order) {
   $this->order = $order;
}
Listeners
All of the activities included in an event that is being registered are handled by listeners. All of the listeners in the app/listeners directory are created using the artisan command event:generate. A file called EventListener.php, which contains all the methods needed to handle listeners, is included in the Listeners folder.
EventListener.php
<?php

namespace App\Listeners;

use App\Events\SomeEvent;
use Illuminate\Queue\InteractsWithQueue;
use Illuminate\Contracts\Queue\ShouldQueue;

class EventListener{
   /**
      * Create the event listener.
      *
      * @return void
   */

   public function __construct() {
      //
   }

   /**
      * Handle the event.
      *
      * @param SomeEvent $event
      * @return void
   */

   public function handle(SomeEvent $event) {
      //
   }
}
It has a handle function for handling different events, as the code states. A single event can be the target of multiple separate listeners that we can build.
Using Facades in Laravel
Classes present in the application’s service container can be accessed using a static interface provided by facades. As static stand-ins for underlying classes in the service container, Laravel facades offer the advantages of a concise, expressive syntax and greater testability and flexibility than conventional static methods.
Building Laravel Facades
The steps to create a facade in Laravel are as follows:
- Step 1: Create a PHP class file.
- Step 2 Bind the class to the service provider.
- Step 3: Add the ServiceProvider to the Set up \app.php as a provider.
- Step 4: Create a class that extends to the Under lluminate\Support\Facades\Facade.
- Step 5: Set up point 4 as an alias for Config\app.php.
Laravel Facade Class Documentation
There are numerous facades on Laravel ships. The built-in Facade class references are displayed in the following table.
| Facade | Class | Service Container Binding |
| App | Illuminate\Foundation\Application | app |
| Artisan | Illuminate\Contracts\Console\Kernel | artisan |
| Auth | Illuminate\Auth\AuthManager | auth |
| Auth (Instance) | Illuminate\Auth\Guard | |
| Blade | Illuminate\View\Compilers\BladeCompiler | blade.compiler |
| Bus | Illuminate\Contracts\Bus\Dispatcher | |
| Cache | Illuminate\Cache\Repository | cache |
| Config | Illuminate\Config\Repository | config |
| Cookie | Illuminate\Cookie\CookieJar | cookie |
| Crypt | Illuminate\Encryption\Encrypter | encrypter |
| DB | Illuminate\Database\DatabaseManager | db |
| DB (Instance) | Illuminate\Database\Connection | |
| Event | Illuminate\Events\Dispatcher | events |
| File | Illuminate\Filesystem\Filesystem | files |
| Gate | Illuminate\Contracts\Auth\Access\Gate | |
| Hash | Illuminate\Contracts\Hashing\Hasher | hash |
| Input | Illuminate\Http\Request | request |
| Lang | Illuminate\Translation\Translator | translator |
| Log | Illuminate\Log\Writer | log |
| Illuminate\Mail\Mailer | mailer | |
| Password | Illuminate\Auth\Passwords\PasswordBroker | auth.password |
| Queue | Illuminate\Queue\QueueManager | queue |
| Queue (Instance) | Illuminate\Queue\QueueInterface | |
| Queue (Base Class) | Illuminate\Queue\Queue | |
| Redirect | Illuminate\Routing\Redirector | redirect |
| Redis | Illuminate\Redis\Database | redis |
| Request | Illuminate\Http\Request | request |
| Response | Illuminate\Contracts\Routing\ResponseFactory | |
| Route | Illuminate\Routing\Router | router |
| Schema | Illuminate\Database\Schema\Blueprint | |
| Session | Illuminate\Session\SessionManager | session |
| Session (Instance) | Illuminate\Session\Store | |
| Storage | Illuminate\Contracts\Filesystem\Factory | filesystem |
| URL | Illuminate\Routing\UrlGenerator | url |
| Validator | Illuminate\Validation\Factory | validator |
| Validator (Instance) | Illuminate\Validation\Validator | |
| View | Illuminate\View\Factory | view |
| View (Instance) | Illuminate\View\View |
Example
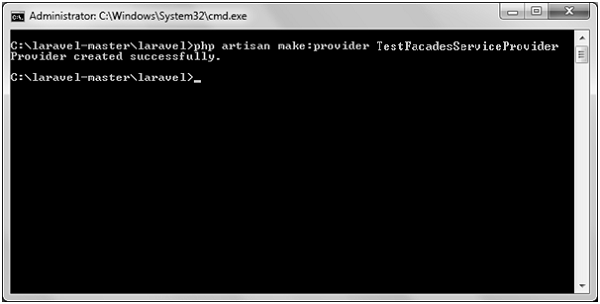
Step 1: Use the following command to create a service provider named TestFacadesServiceProvider.
Step 2 : Following a successful execution, you will obtain the output that follows:
Step 3: On App/Test, create a class named TestFacades.php.
App/Test/TestFacades.php
<?php
   namespace App\Test;
   class TestFacades{
      public function testingFacades() {
         echo "Testing the Facades in Laravel.";
      }
   }
?>
Step 4: At App/Test/Facades, create a Facade class named TestFacadesServiceProviders.php.
App/Test/Facades/TestFacades.php
<?php

namespace app\Test\Facades;

use Illuminate\Support\Facades\Facade;

class TestFacades extends Facade {
   protected static function getFacadeAccessor() { return 'test'; }
}
Step 5 − Create a Facade class called TestFacadesServiceProviders.php at App/Test/Facades.
App/Providers/TestFacadesServiceProviders.php
<?php
namespace App\Providers;
use App;
use Illuminate\Support\ServiceProvider;
class TestFacadesServiceProvider extends ServiceProvider {
public function boot() {
//
}
public function register() {
App::bind('test',function() {
return new \App\Test\TestFacades;
});
}
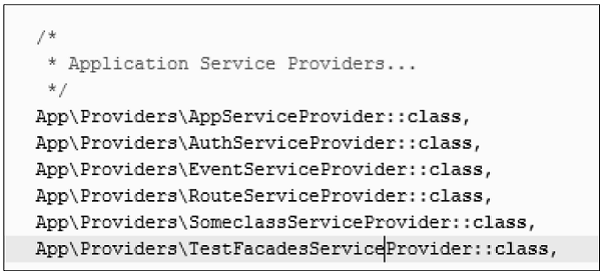
}Step 6: As seen in the figure below, add a service provider to the config/app.php file.
config/app.php
Step 7: As seen in the figure below, add an alias to the config/app.php file.
config/app.php

Step 8 − Add the following lines in app/Http/routes.php.
app/Http/routes.php
Route::get('/facadeex', function() {
return TestFacades::testingFacades();
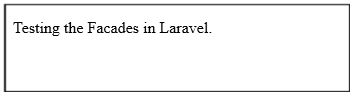
});Step 9 − Visit the following URL to test the Facade.
http://localhost:8000/facadeexStep 10 : The following output will appear after you visit the URL: